
A form that works well on one WordPress website might need to be reused on another. Submission data may need to go into a spreadsheet, external applications may need to submit entries directly to your website, and different forms may require different email notifications or confirmation messages.
Gutena Forms Free v2.2.0 introduces four major updates that give you more control over form data, integrations, email notifications, and submission experiences.
Here’s what you can expect from this release:
- Import & Export Forms and Entries: Move form configurations between websites and export submission data for reporting and recordkeeping.
- REST API Settings: Connect Gutena Forms with external applications and manage programmatic form submissions.
- Updated Email Notifications: Manage notification defaults, configure multiple emails, and personalize messages with supported merge tags.
- Form Confirmation Settings: Customize post-submission messages, form behavior, and visitor redirects.
Explore the New Features in Gutena Forms v2.2.0
From migrating forms between websites to customizing what happens after submission, here’s a closer look at each improvement.
Feature 01: Import and Export Gutena Forms and Form Entries
Moving forms between WordPress websites or exporting submission data for reporting shouldn’t require rebuilding forms or manually copying entries.
Gutena Forms v2.2.0 introduces import and export functionality for both form configurations and collected entries.
Export Single or Multiple Gutena Forms as JSON
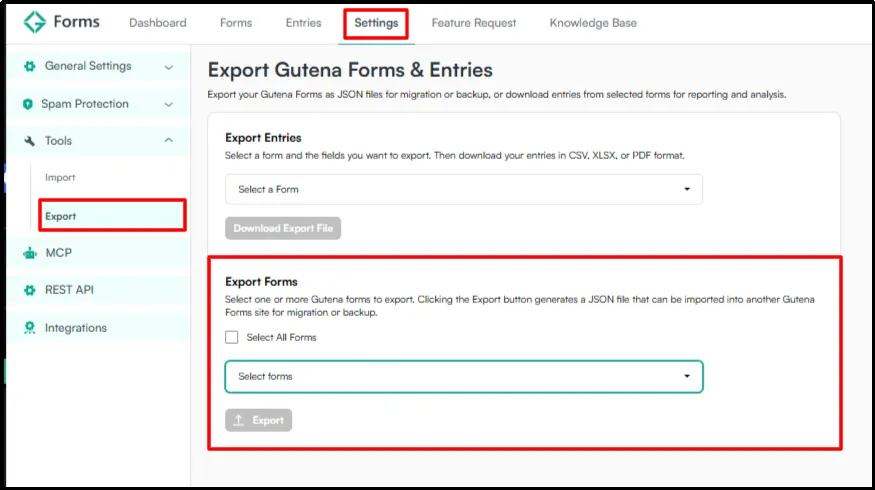
You can export individual forms, multiple forms, or all your forms as JSON files. These files let you back up your form configurations or migrate them to another WordPress website running Gutena Forms.
To export your forms:
- Go to Gutena Forms → Settings → Tools → Export.
- Find the Export Forms section.
- Select one, multiple, or all forms you want to export.
- Click on Export to generate the JSON export file.
You can use these exports to:
- Transfer form configurations between WordPress installations.
- Reuse existing forms across multiple websites.
- Keep copies of your form configurations.
- Reduce repetitive form setup work.
Import Gutena Forms Using JSON Files
Once you have an exported JSON file, you can import the form into another website running Gutena Forms.
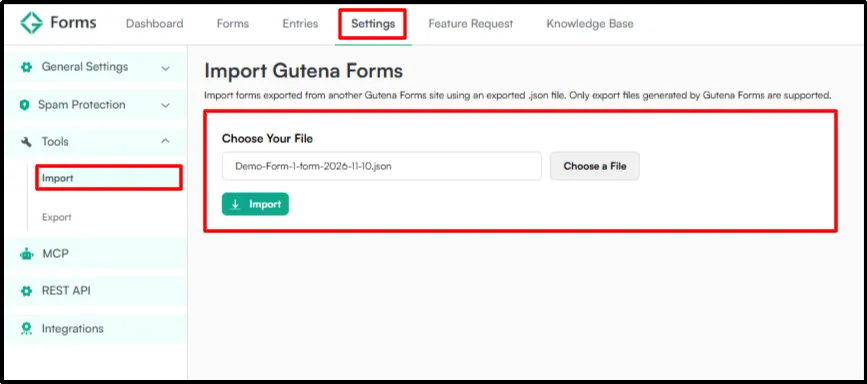
Upload the JSON export file using the available import option to transfer the form configuration without manually rebuilding its fields and settings.
- Go to Gutena Forms → Settings → Tools → Import.
- Choose a suitable Gutena Form JSON File.
- Click Import to complete the process.
This is particularly useful when migrating forms between websites or reusing existing form configurations across client projects.
Export Form Entries in CSV, XLSX, and PDF
You can now export collected form entries in three different formats:
- CSV: Export submission data for spreadsheets, data processing, and reporting tools.
- XLSX: Open and organize form entries in Microsoft Excel and compatible spreadsheet applications.
- PDF: Download submission information in a document format.
To export form entries:
- Navigate to Gutena Forms → Settings → Tools → Export.
- Under Export Entries, select a form.
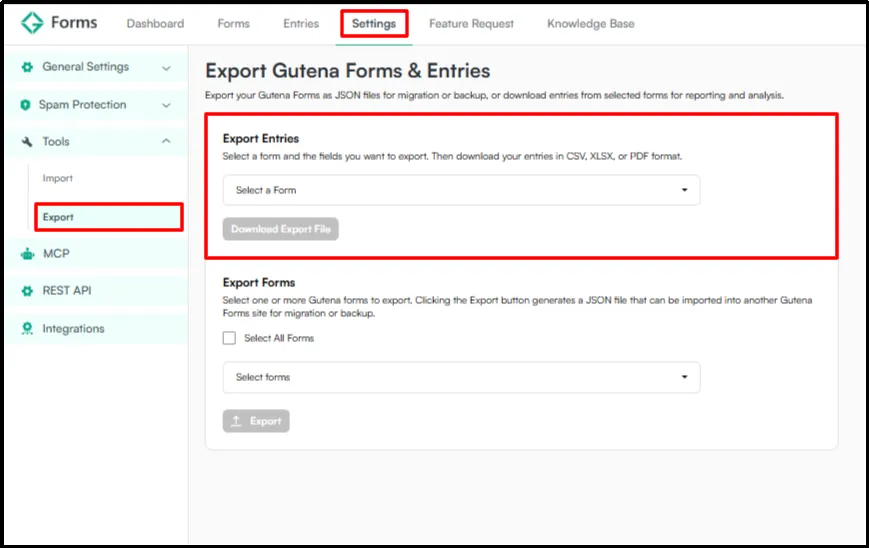
- Select the form fields you want to include.
- Choose your preferred export format: CSV, XLSX, or PDF and click on Download Export File.
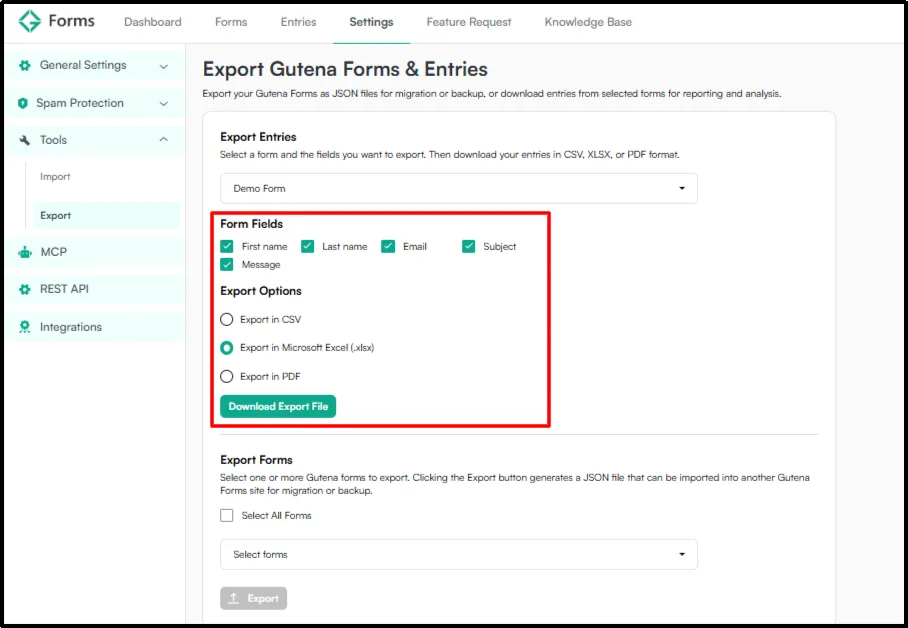
For example, if a contact form collects names, email addresses, and messages, you can select only the fields relevant to your report instead of exporting every available field. To access all supported field types when building forms and exporting submissions, explore Gutena Forms Pro.
This gives you more control over exported data and makes it easier to prepare reports or share relevant submission information.
Feature 02: Connect Gutena Forms With External Applications Using REST API
Gutena Forms v2.2.0 introduces REST API support, allowing external applications such as chatbots and custom integrations to submit form entries directly into your WordPress website.
You can enable or disable API access from Gutena Forms settings. When enabled, the /submit-entry endpoint accepts external submissions and stores them in your Gutena Forms entries, just like regular form submissions. When disabled, the endpoint returns a 404 response.
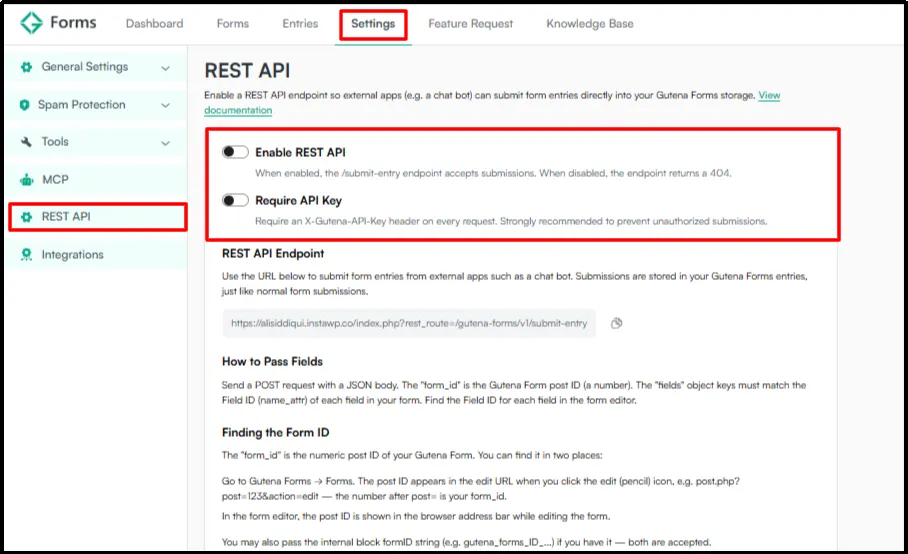
You can also enable the Require API Key option to protect the endpoint. When this option is active, every request must include a valid X-Gutena-API-Key header. This is strongly recommended to prevent unauthorized submissions.
Submit Form Entries Through REST API
To submit entries from an external application, send a POST request to your Gutena Forms REST API endpoint with a JSON body containing the form ID and field values.
Your request should include:
- Endpoint: Your website’s Gutena Forms /submit-entry API URL.
- Form ID: The numeric post ID of the Gutena Form you want to submit entries to. You can find it in the form’s edit URL or browser address bar. The internal block form ID is also supported.
- Fields: A JSON object containing the form field IDs and their corresponding values. You can find each Field ID (name_attr) in the form editor.
- API Key: If API key protection is enabled, include a valid X-Gutena-API-Key header.
For endpoint details, request requirements, and integration instructions, refer to the Gutena Forms REST API documentation.
Feature 03: Configure Multiple Email Notifications With Advanced Controls
Gutena Forms v2.2.0 introduces a more flexible email notification system with global defaults and individual form settings. You can configure default notification details for new forms, manage multiple notifications, and customize email content for specific forms.
Set Global Email Notification Defaults
To configure default notification settings, go to Gutena Forms → Settings → General Settings → Email Notifications.
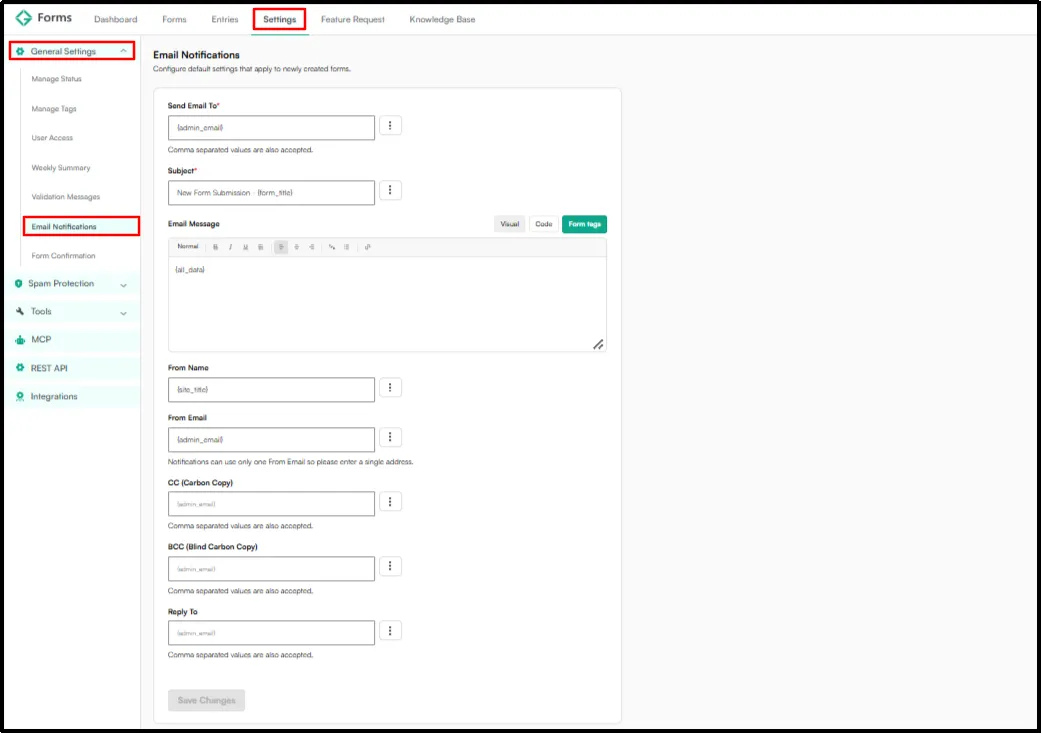
Under Email Notifications, you can customize:
- Recipients and Subject: Set default recipient addresses and email subject lines.
- Email Message: Customize notification content using supported form tags and merge tags.
- Sender Details: Configure From Name and From Email.
- CC, BCC, and Reply-To: Add additional recipients and specify where replies should go.
Click Save Changes to apply your preferences.
New forms inherit these global settings, while existing forms retain their individual notification configurations.
Manage Notifications for Individual Forms
You can also configure email notifications separately for each form.
Open a form in the WordPress editor, select the Gutena Forms block, and scroll to Email Notification. Use the toggle to enable or disable notifications, then click Configure to manage them.
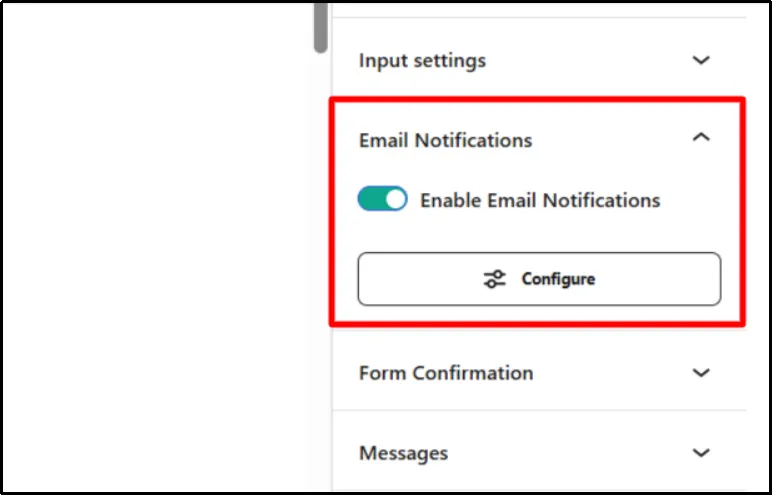
You can add, edit, or delete multiple notifications for a form.
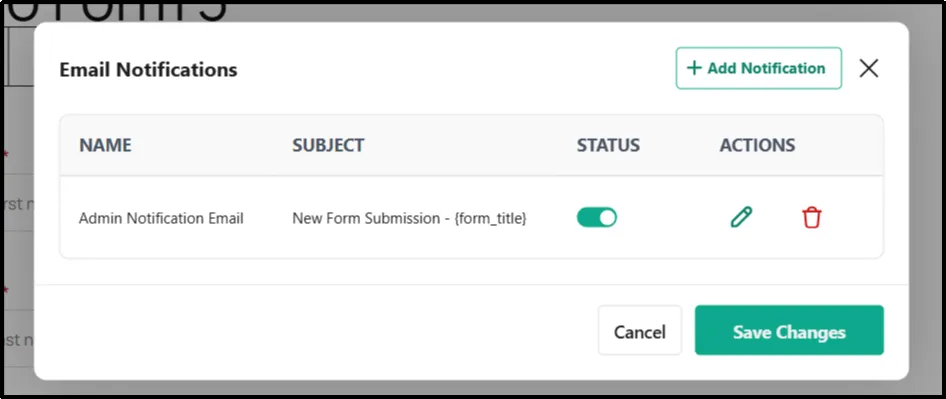
Each notification can have its own recipients, subject, message, sender details, CC, BCC, and Reply-To settings.
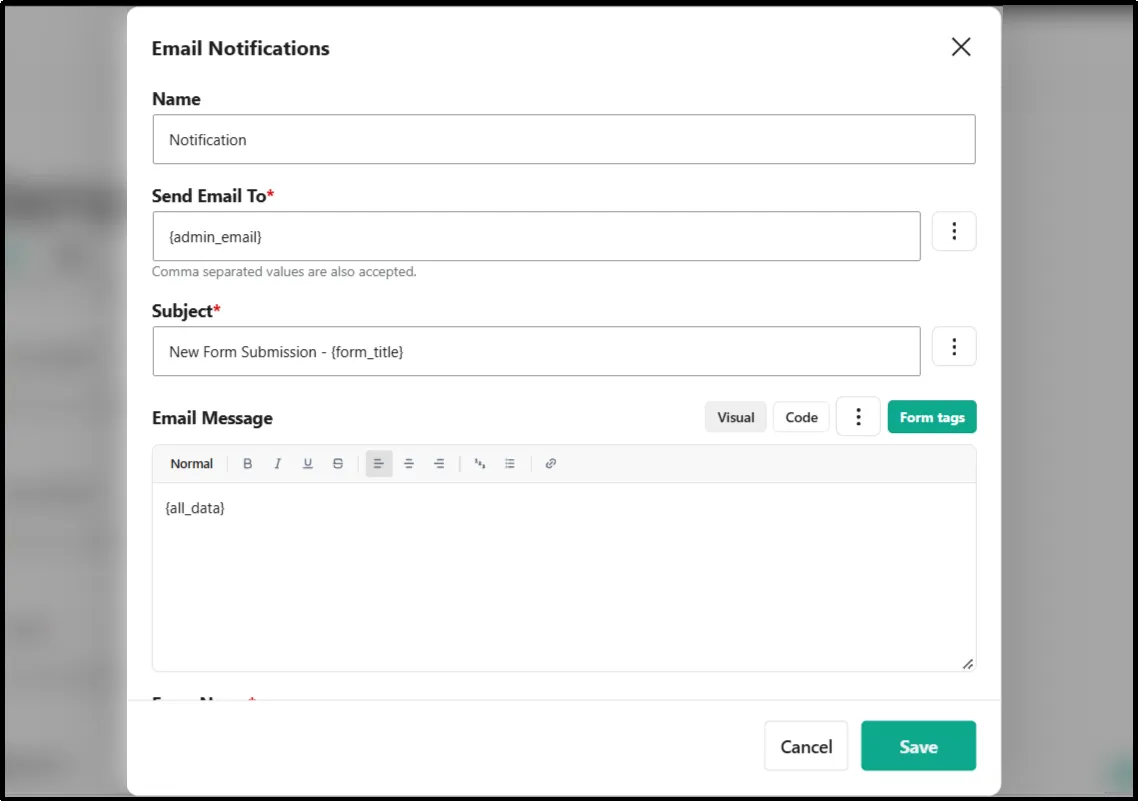
You can also insert supported merge tags to include submitted form-field data and general website or user information in notification emails.
Feature 04: Customize Form Confirmation Messages and Redirects
After submitting a form, visitors need clear feedback about what happened next.
You might want to display a confirmation message, redirect visitors to a dedicated thank-you page, or clear the form fields so they can submit another response.
Gutena Forms v2.2.0 introduces global and per-form confirmation settings to help you control these post-submission experiences.
Set Global Form Confirmation Defaults
Go to Gutena Forms → Settings → General Settings → Form Confirmations.
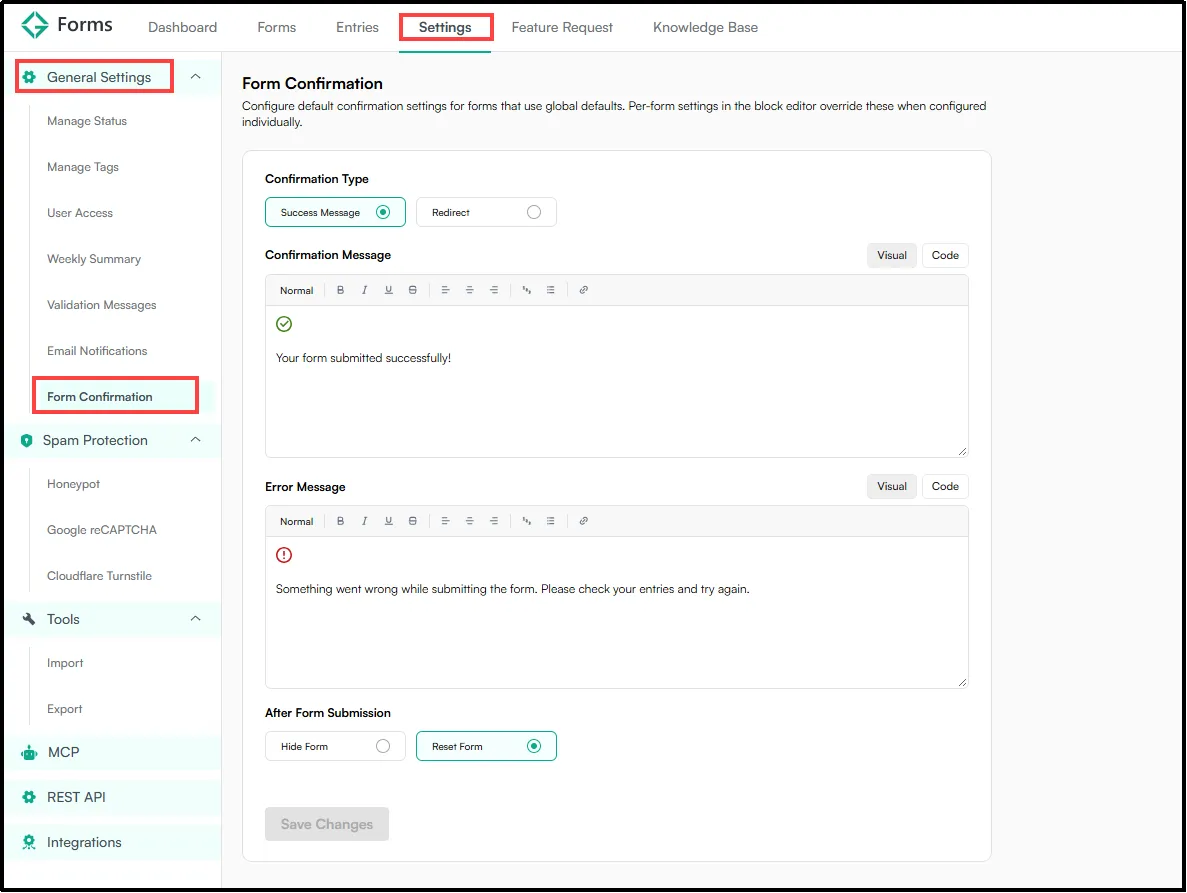
You can configure the default confirmation type:
- Success Message: Display a customized message after successful submission.
- Redirect: Send visitors to a published WordPress page or custom URL.
You can also choose whether to hide the form or reset its fields after successful submission.
New forms inherit these global confirmation settings, while existing forms retain their individual configurations.
Configure Confirmations for Individual Forms
To customize confirmation behavior for a specific form, open it in the WordPress editor and select the Gutena Forms block.
Scroll to Form Confirmation, use the toggle to enable or disable the feature, and click Configure to adjust its settings.
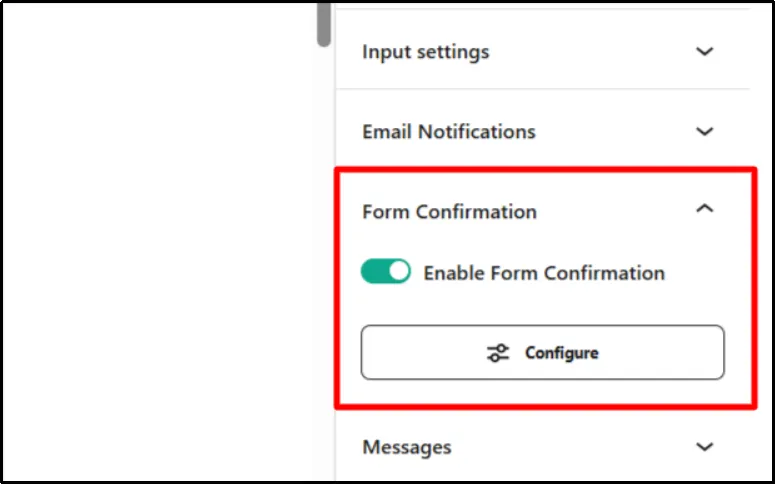
You can choose between displaying a success message and redirecting visitors to a WordPress page or custom URL. You can also customize the success and error messages and control whether the form hides or resets after successful submission.
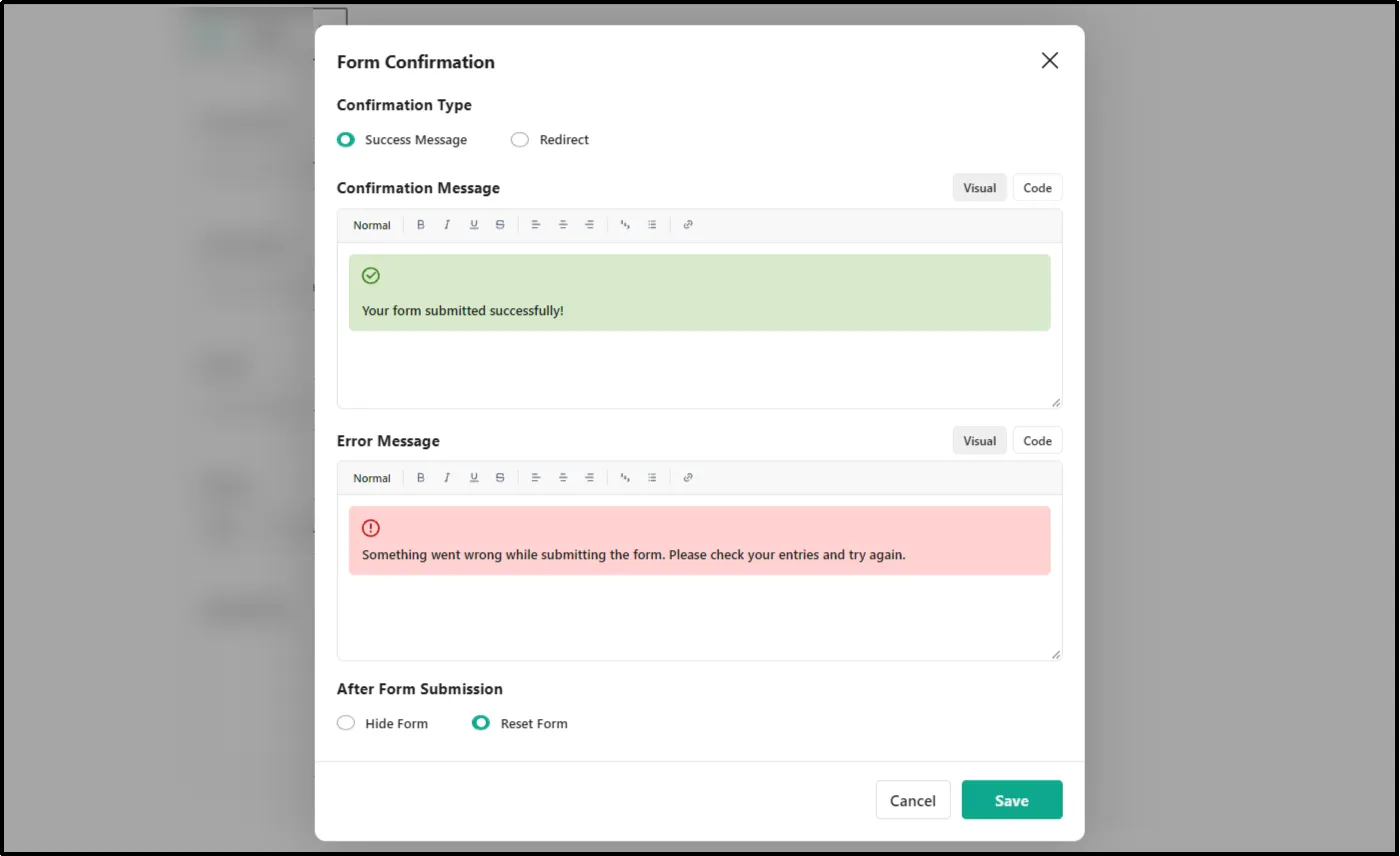
This lets you create different post submission experiences for different forms without changing your website-wide defaults.
How to Get Started With Gutena Forms v2.2.0
To access these new features, update Gutena Forms to version 2.2.0 from your WordPress dashboard.
If you haven’t installed Gutena Forms, follow these steps:
- Open your WordPress dashboard.
- Go to Plugins → Add Plugin.
- Enter Gutena Forms in the search bar.
- Click Install Now, then Activate.
- Open Gutena Forms and explore the updated settings and functionality.
You can then import or export forms, configure REST API access, update notification settings, and customize confirmation behavior according to your requirements.
For more information about managing forms, configuring notifications, and using REST API integrations, refer to the Gutena Forms documentation.
Manage Your WordPress Forms With More Flexibility
Gutena Forms Free v2.2.0 introduces four major improvements to form management and customization.
You can now transfer form configurations using JSON files, export submission data in multiple formats, connect forms with external applications through REST API endpoints, and configure more flexible email notifications.
The updated confirmation settings also give you greater control over what visitors see after submitting a form.
Whether you manage a single WordPress website or build forms for multiple clients, these improvements make everyday form management more flexible.
Get Gutena Forms Free v2.2.0 and put the new features to work!
Stay Tuned for More Gutena Forms Updates
We’re continuing to improve Gutena Forms with features that simplify form creation, submission management, and integrations.
Your feedback plays an important role in shaping future updates.
If you have an idea for a new feature or an improvement to an existing one, share it with our team and help us make Gutena Forms better.