

Long forms can overwhelm visitors when they display too many questions on one page. A multi-step form breaks those questions into smaller sections, helping users focus on one group of fields at a time.
You can create a multi-step form in WordPress with Gutena Forms Pro by adding a Step Break field between groups of questions. You can then customize step titles, navigation buttons, and progress indicators without building the form from scratch.
This guide walks you through the setup, explains how to organize your fields, and shows you what to test before publishing.
What is a Multi-Step Form?
A multi-step form divides a single form into separate screens or stages. Instead of showing every field at once, it displays one group of questions at a time and lets visitors move between steps using navigation buttons.
For example, a registration form might collect basic details on the first screen, additional information on the second, and preferences on the third.
The form still collects information through one submission process. The steps organize the questions into smaller sections.
Why Use a Multi-Step Form in WordPress?
A multi-step layout can make a long form easier to navigate, especially when the questions fall into distinct groups. Its usefulness depends on the form’s purpose and the amount of information you need to collect.
1. Make Long Forms Easier to Navigate
A long page of fields can make it difficult for visitors to find their place or understand how much information they need to provide. Dividing the form into stages gives each group of questions a clear purpose.
For example, a job application could separate contact details, work experience, and supporting information into individual steps.
2. Group Related Questions Together
Organized fields help visitors understand why you’re asking for particular information. You can group contact details, preferences, and follow-up questions instead of mixing unrelated fields on one screen.
Clear groupings also make it easier to review and maintain the form as your requirements change.
3. Show Visitors Their Progress
A multi-step form can display step labels or a progress bar so visitors can see their position in the process. Clear navigation labels, such as “Next” and “Back,” also help users understand how to continue or revisit an earlier section.
4. Organize Forms for Smaller Screens
A multi-step layout can reduce the number of fields visitors see at once on a mobile device. But splitting a form into steps doesn’t automatically make it mobile-friendly. You should still test field widths, labels, buttons, and spacing on smaller screens.
Use Case Scenarios for Multi-Step Forms
Use a multi-step form when your questions naturally fit into separate groups or when a single page would become difficult to navigate.
Registration forms: Collect contact details, account information, and preferences in separate stages.
Lead generation forms: Ask for basic contact information before presenting more detailed questions.
Surveys and questionnaires: Group questions by subject to make the sequence easier to follow.
Job applications: Separate personal details, employment history, and supporting information.
Booking and inquiry forms: Organize customer details, request information, and additional requirements.
A single-page form may work better for a short contact form that only asks for a name, email address, and message. Extra steps can add unnecessary clicks when visitors could complete the form quickly on one screen.
3 Steps to Create a Multi-Step Form in WordPress
You can create a multi-step form without writing code by using a WordPress form plugin that supports page breaks and step navigation. Follow these three simple steps to build your form, organize its fields, and let visitors move between sections before submitting their information.
⚠️ Note: The multi-step form is created through the Step Break field, which is only available in Gutena Forms Pro.
Prerequisites: Install and Activate Gutena Forms Pro
First, install and activate the free Gutena Forms plugin. Gutena Forms Pro requires the free plugin to work.”
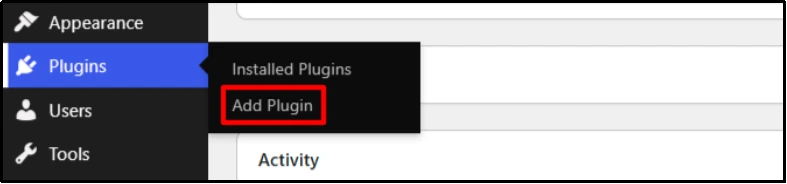
- In your WordPress dashboard, go to Plugins → Add Plugin.
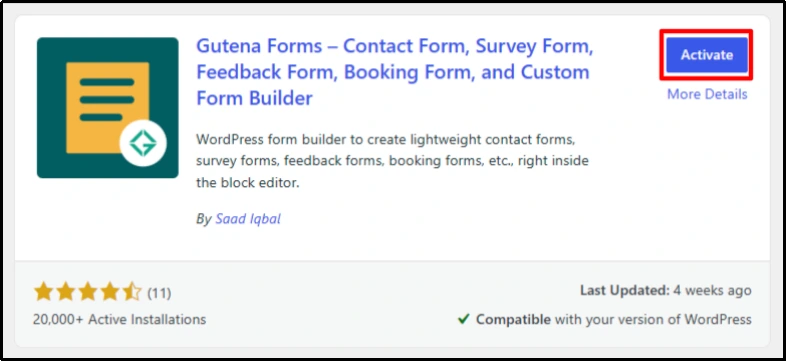
- Search for Gutena Forms.

- Now click Install Now, then, after installation, click Activate.
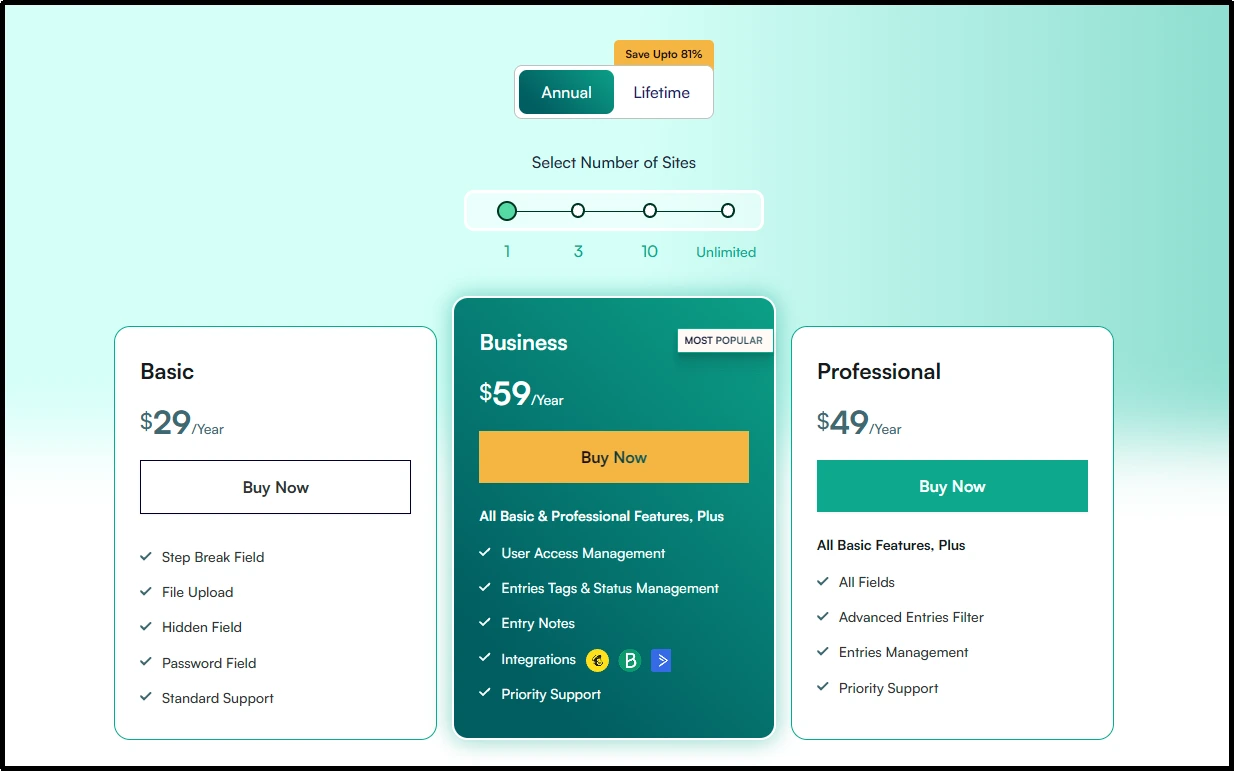
- Visit the Gutena Forms pricing page.
- Purchase any plan of your choice.
- After your purchase, you’ll receive an email with the Gutena Forms Pro ZIP file and license key. Download the file and copy the key for later use.
- Now head to the WordPress dashboard, go to Plugins → Add Plugin, and click on Upload Plugin.
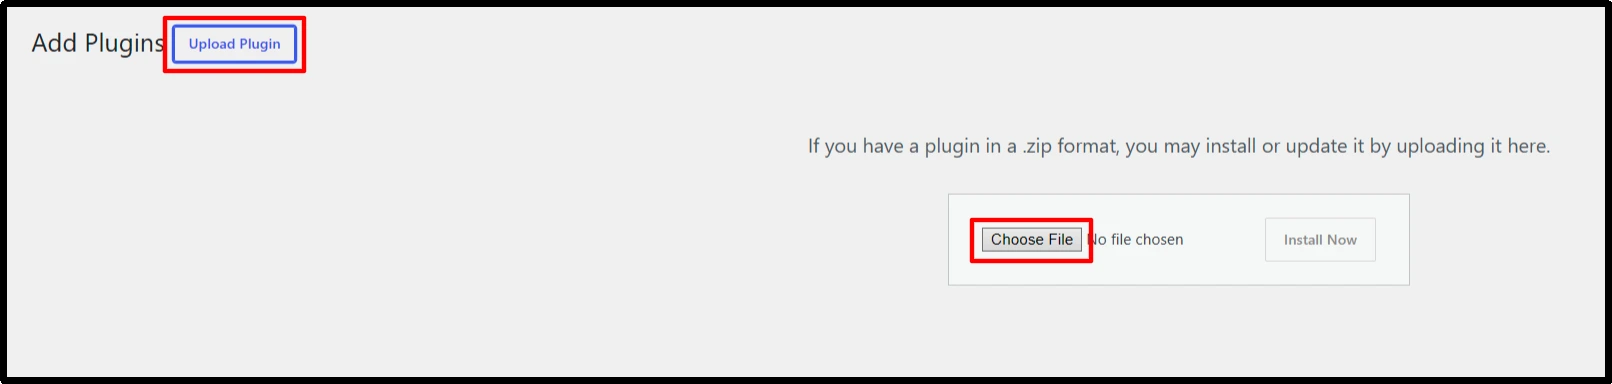
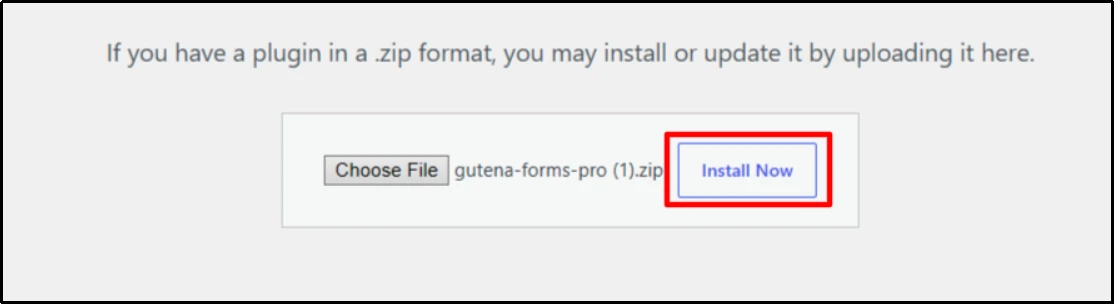
- Click on Choose File and select the Gutena Forms Pro ZIP file.
- Click Install Now.
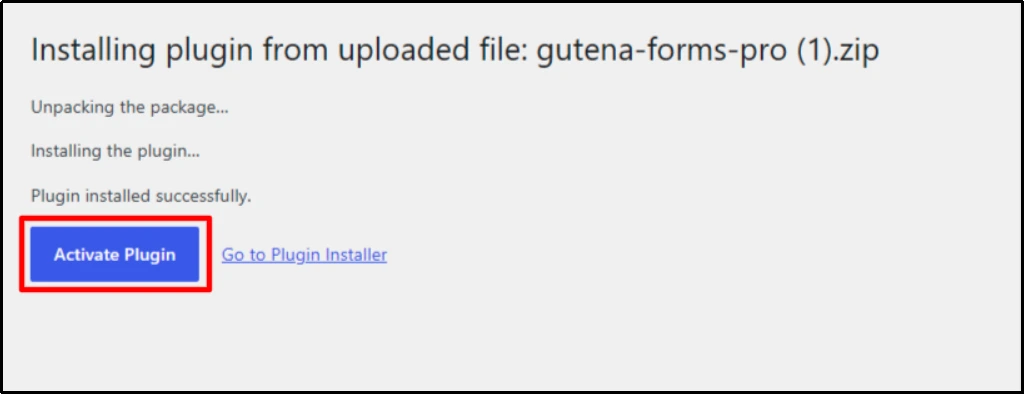
- Click on Activate Plugin.
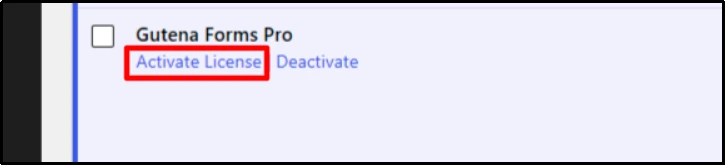
- Scroll down and click on Activate License.
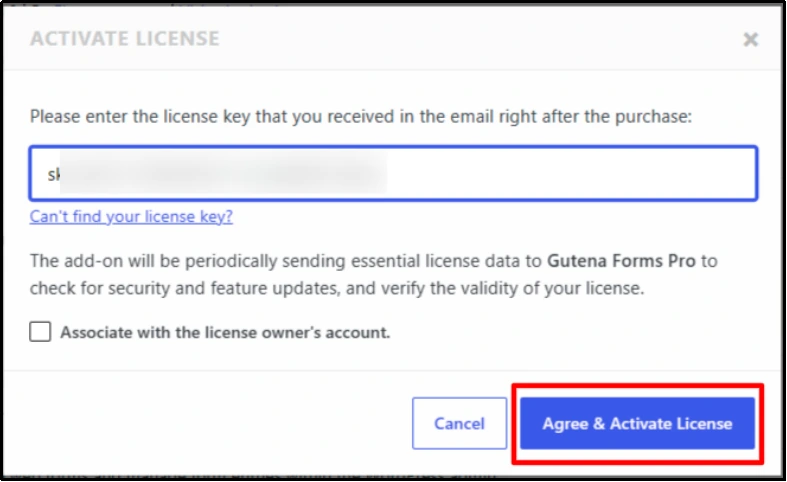
- Paste the license key and click on Agree & Activate License.
Congratulations! You have successfully installed Gutena Forms Pro!
Step 1: Create a Form and Add the Step Break Field
There are two ways to create and publish a form using Gutena Forms:
- Create a form directly on a page: Create a new page, add the Gutena Form block, build your form, and publish the page.
- Create a form separately and add it to a page: Go to Gutena Forms → Add New Form, create and publish your form, then create a new page, insert the existing form, and publish the page.
To demonstrate the process, we’ll create a form separately in Gutena Forms and then embed it on a page.
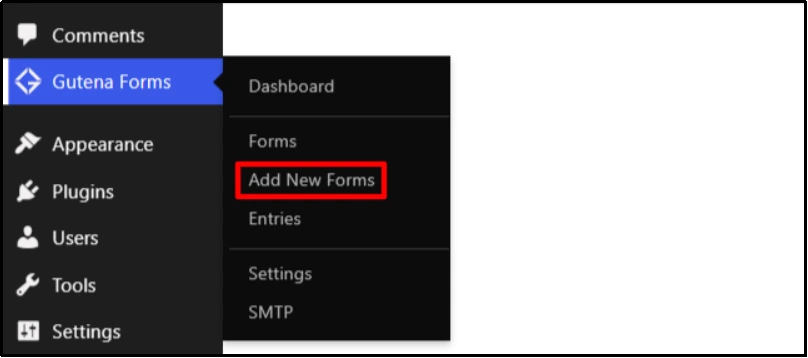
- Go to Gutena Form → Add New Form.
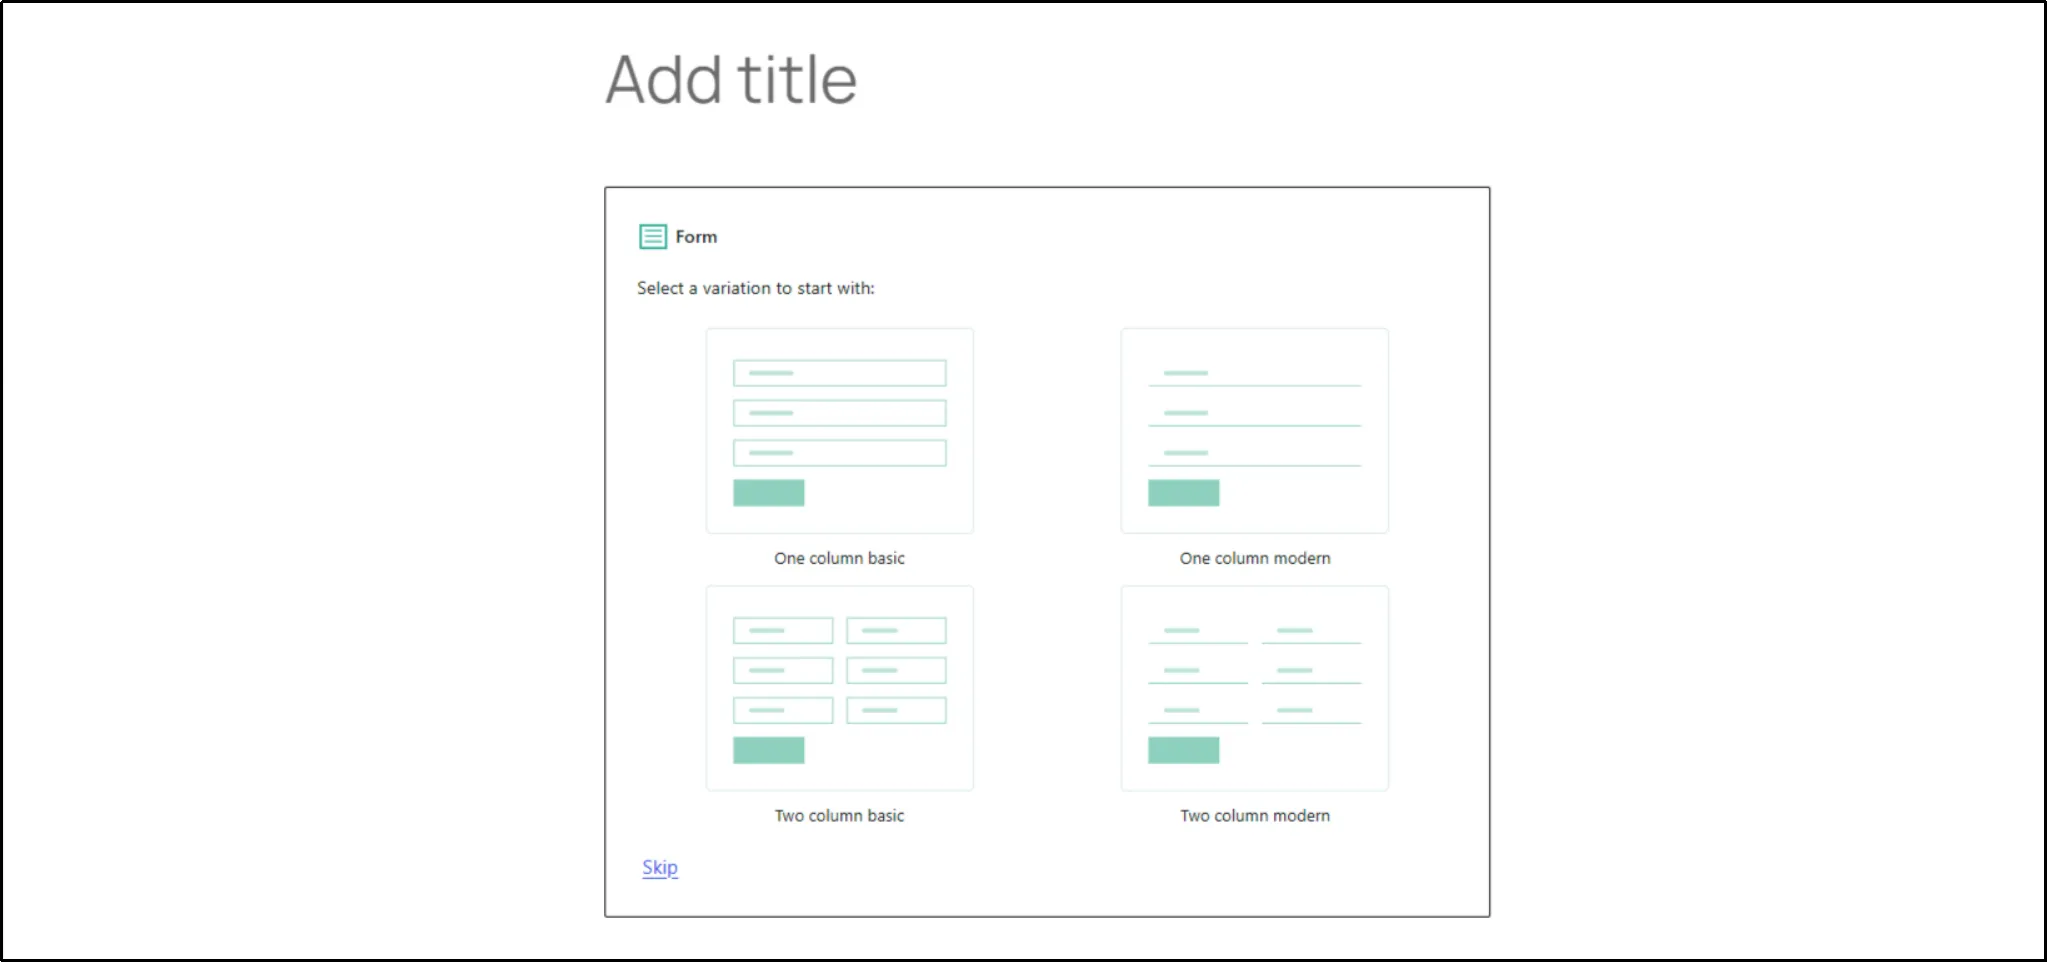
- Enter a Form title and select any variation. You can also choose to skip for manual variations.
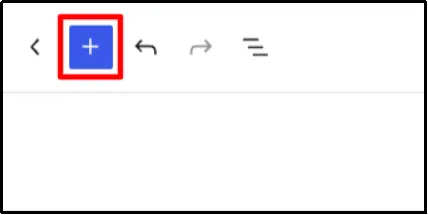
- In the top left, click the + icon.
- Either type Step Break or look for it under Gutena Forms General Fields.
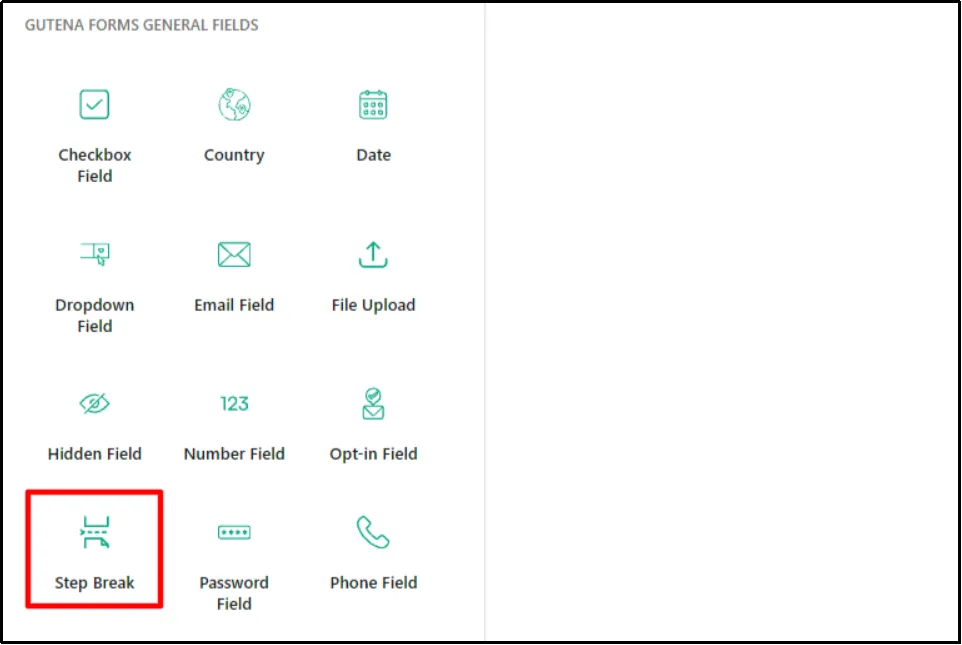
- Drag and drop it where you want to break the form.
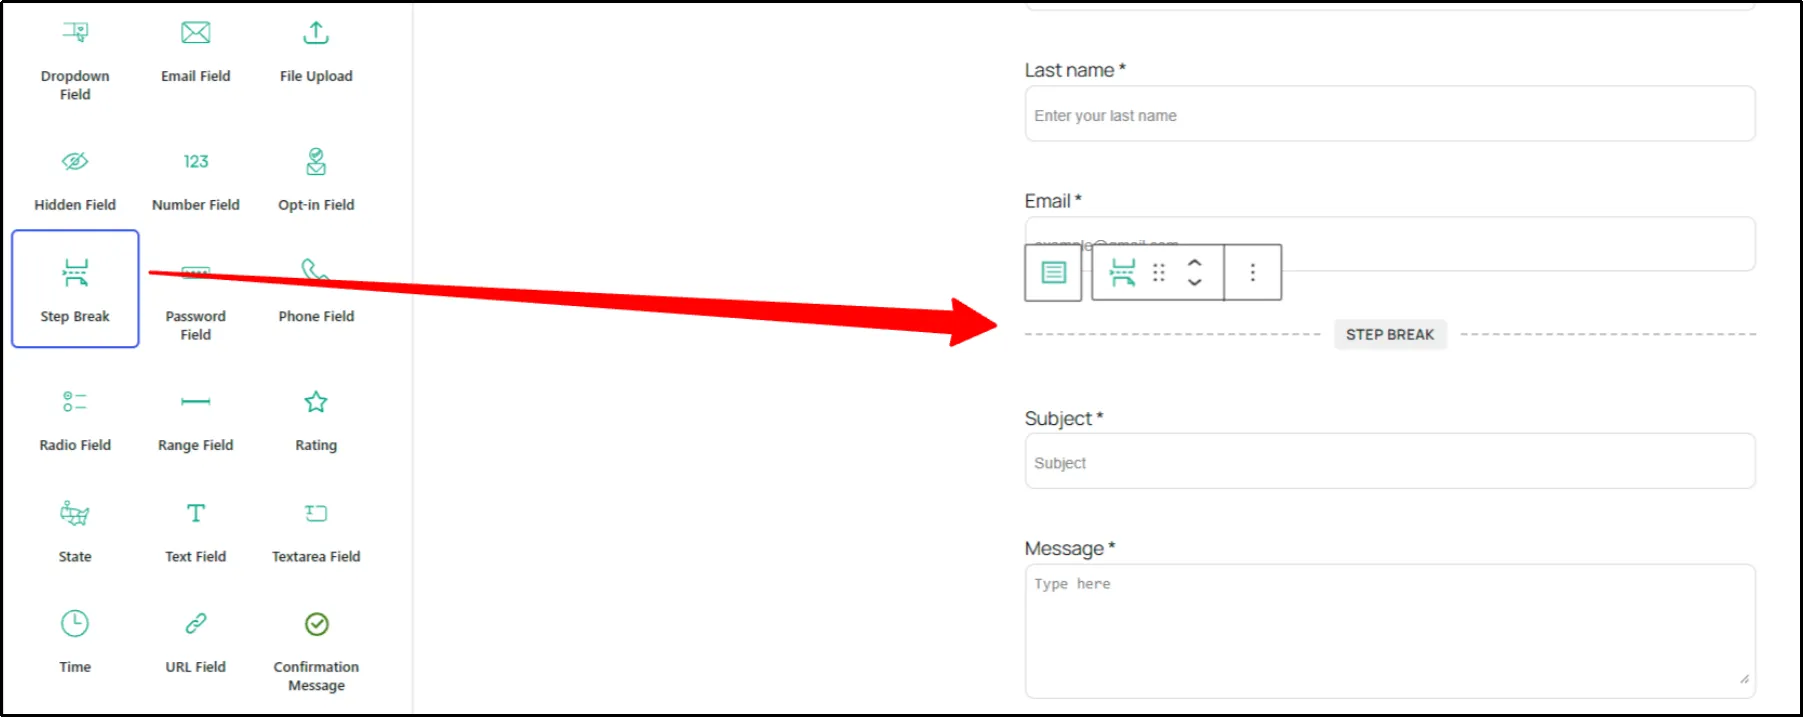
Similarly, you can add as many step breaks as you like. For instance, we added another one.
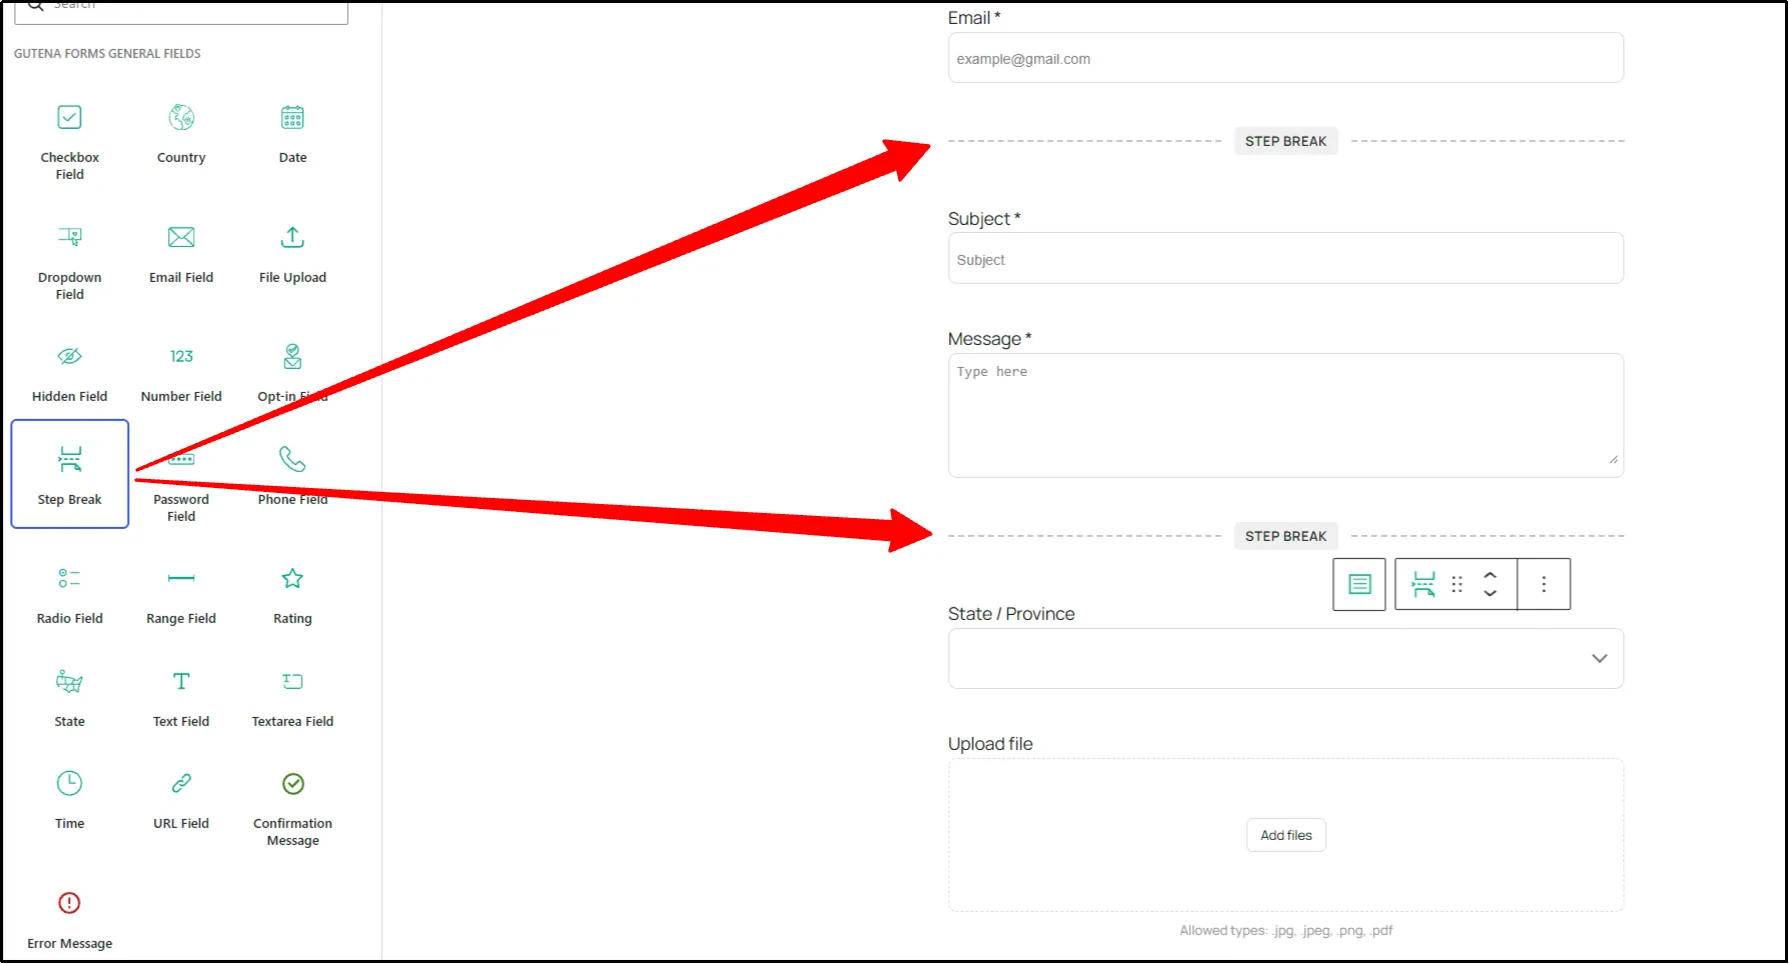
You have almost created a multi-step form. Now you just have to customize it according to your needs, then make it live.
Step 2: Customize Step Titles, Navigation, and Progress
- Click on the form and, on the right under the block section, scroll till you find Step Break.
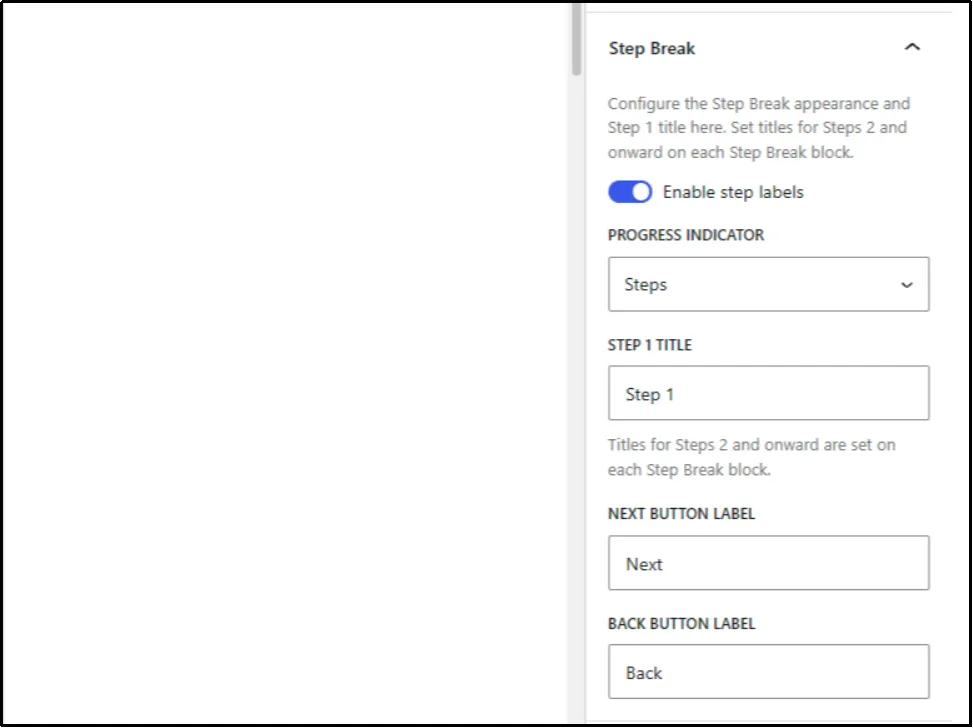
- Click on the dropdown icon to open all the step break customization options.
- You can either have a Steps or Progress indicator or have none at all.
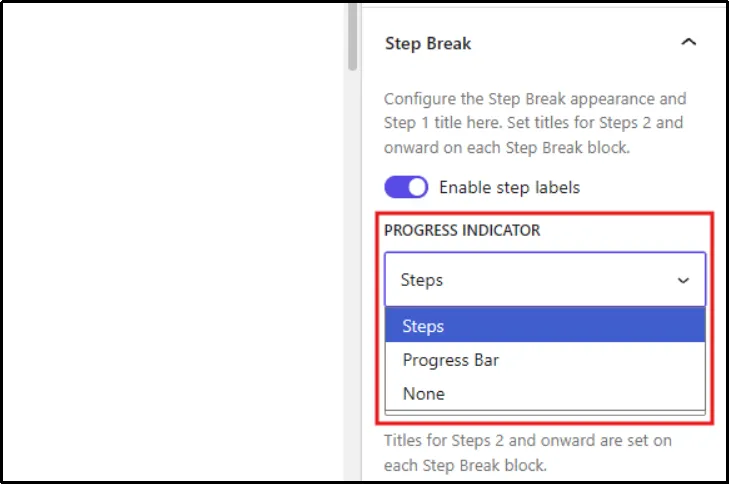
- You can also set a Step 1 Title, but you must manually set the titles of other steps in their own Step Break block.
- You can also change the label of the next and back buttons.
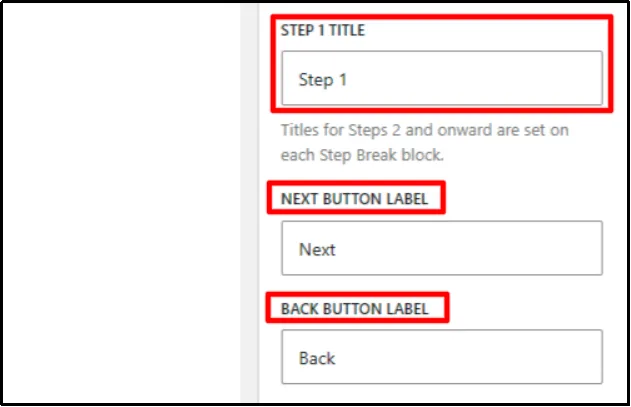
Here’s a quick look at the second step title configuration.
- Select the second Step Break.
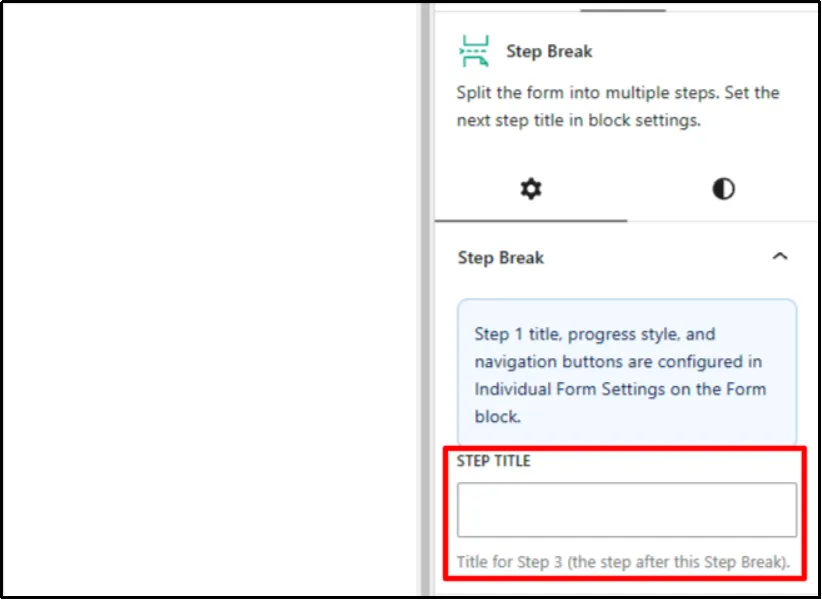
Here you can add your desired second Step Title.
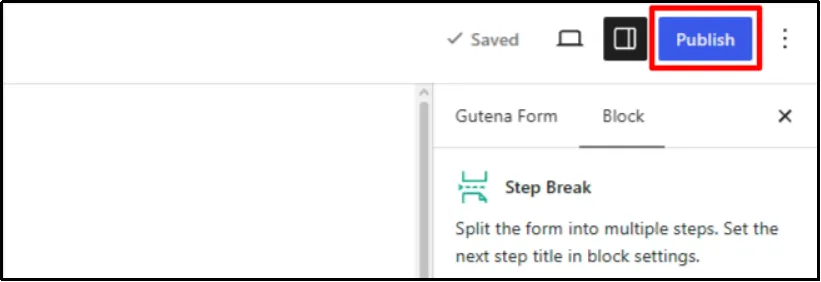
- Once you’ve configured the form, click Publish in the top-right corner.
Step 3: Add the Form to a Page and Publish It.
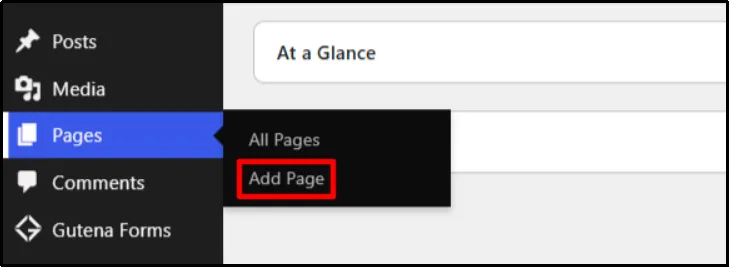
- Go to Pages → Add Page.
- Enter your desired page title, and add any text or other widgets based on your requirements.
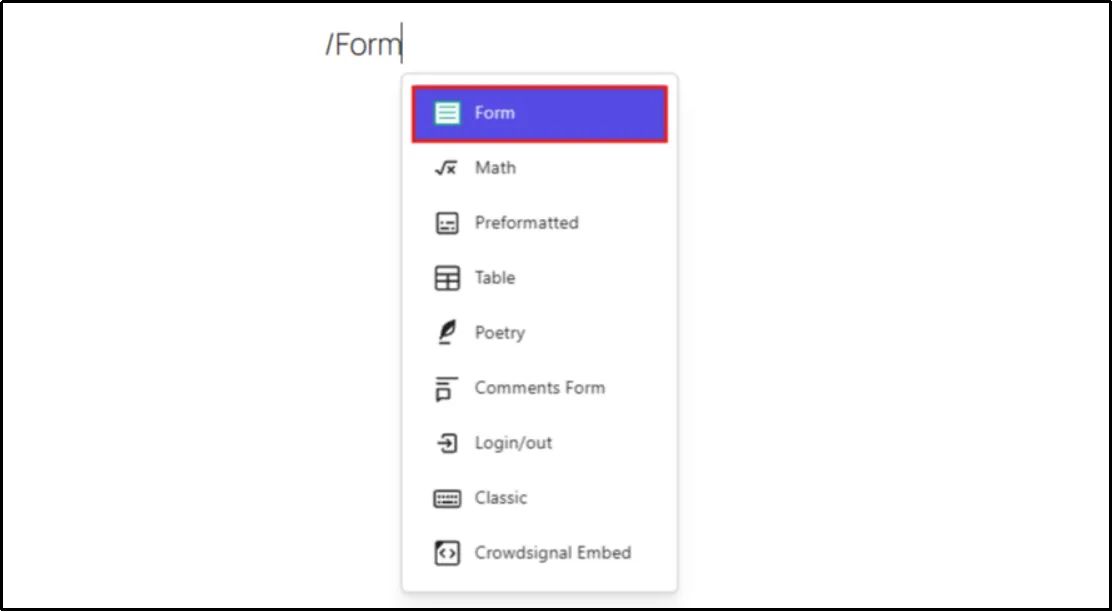
- Now enter /Form and click on the Form block.
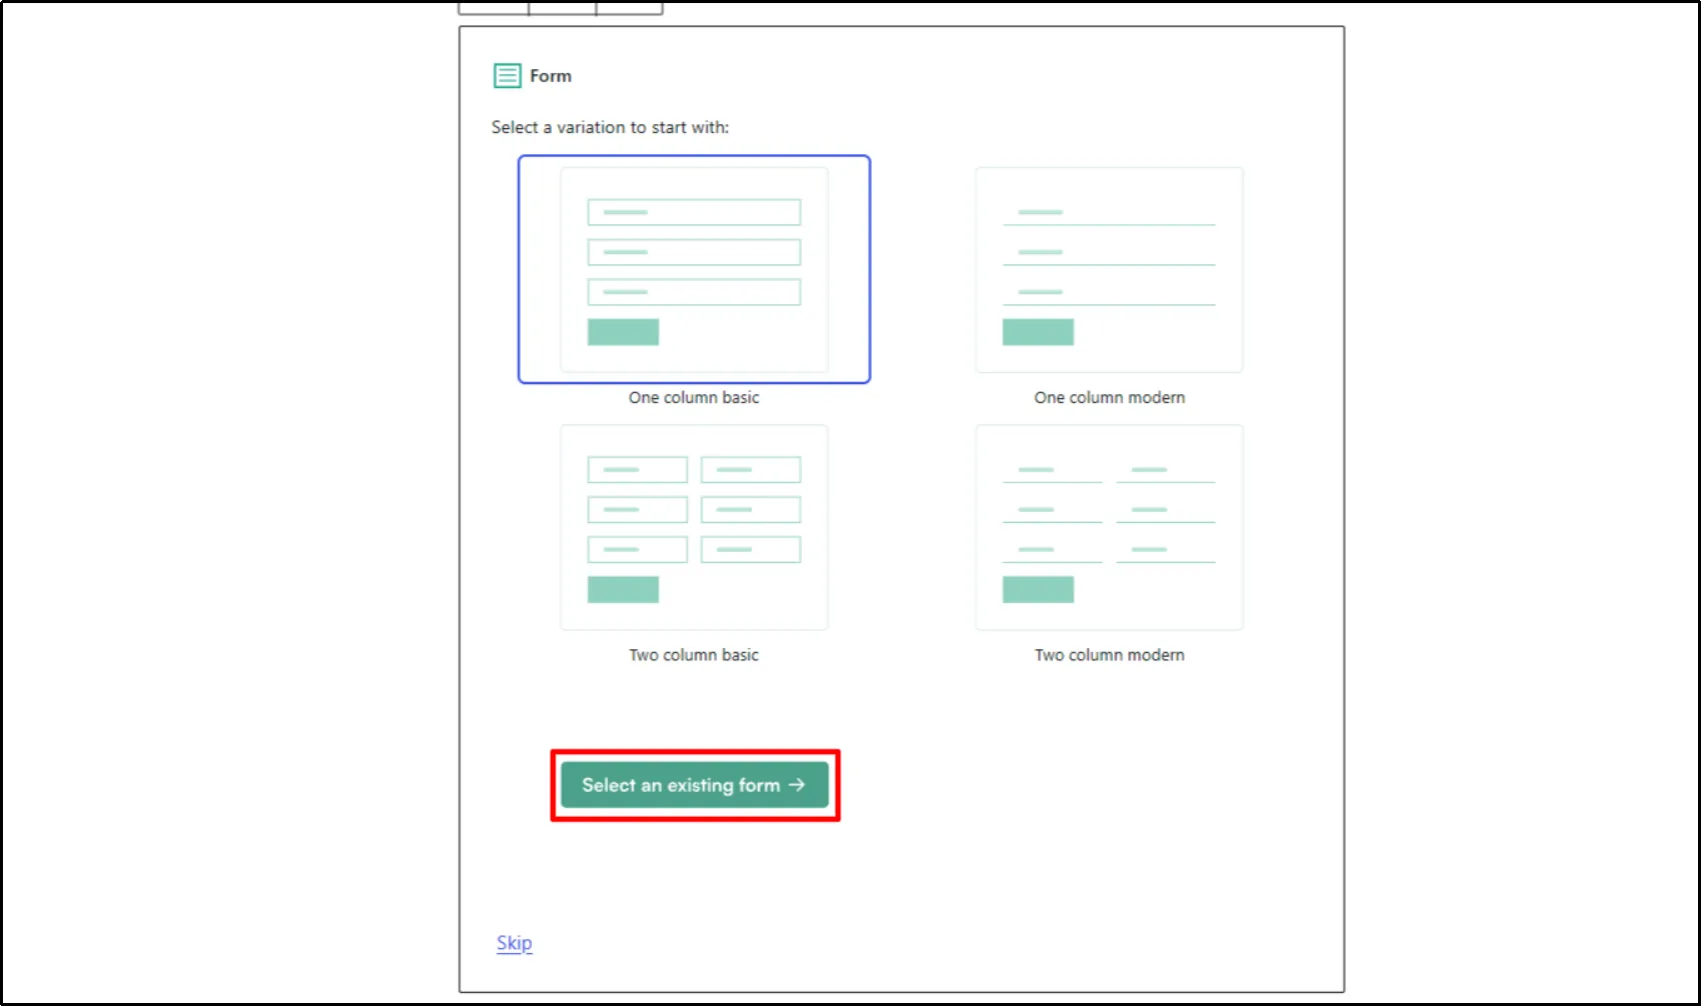
- Click on Select an Existing Form, as we created and published one in the previous step.
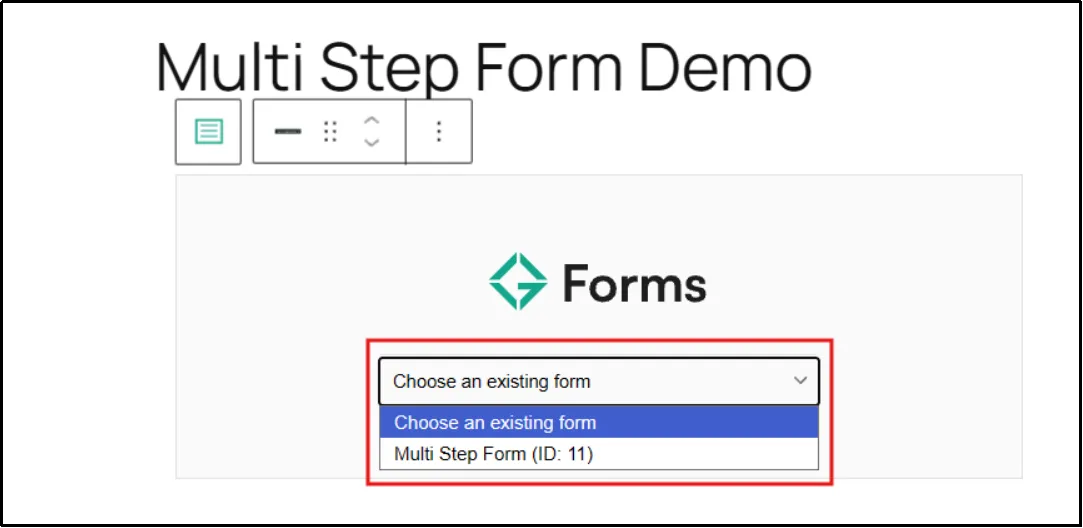
- Click on the dropdown and select the correct form.
- Once your form loads, click on Publish in the top right.

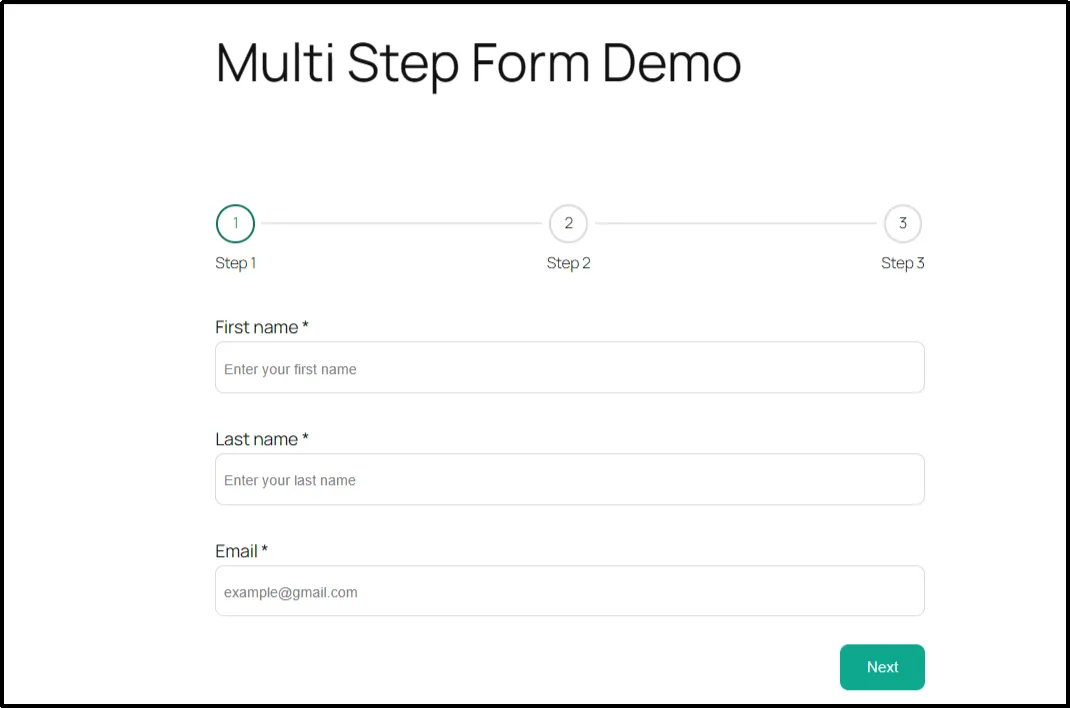
Your multi-step form is ready. Preview it and test every step before sharing the page.
How to Test Your Multi-Step Form Before Sharing
To test your multi-step form from a visitor’s perspective, follow these checks:
- Move through every step. Click Next and Back to confirm that the navigation works as expected.
- Check required fields. Leave a required field empty and verify that the form displays the expected validation message.
- Review your step titles. Make sure each title describes the information visitors need to provide.
- Test the final submission. Submit valid information and confirm that the form completes the submission process.
- Check email notifications. If your form sends email notifications, confirm that they reach the intended inbox.
- Test on mobile. Check the fields, buttons, navigation, and spacing on a smaller screen.
Fix any issues before publishing the page. A form that looks correct in the editor still needs to work correctly on the front end.
Best Practices for Building a Multi-Step Form
A well-organized form gives visitors clear instructions, predictable navigation, and a straightforward path to submission.
- Keep Each Step Focused: Group related questions together. Avoid placing unrelated fields on the same screen.
- Use Clear Step Titles: Describe what visitors should expect in each section. Specific titles are more useful than vague labels.
- Make Navigation Easy to Understand: Use familiar labels for moving forward and backwards. Check that the buttons are easy to use on all screens.
- Configure Required Fields Correctly: Mark fields as required when you need an answer before submission. Test the form to confirm that visitors cannot move forward past incomplete required fields.
- Test the Form on Mobile: Open the form on a phone-sized screen and move through every step.
- Test the Complete Submission Process: Submit a test entry and verify that the form accepts valid information and handles missing required fields as expected.
Make Your Multi-Step Form Live With Gutena Forms Pro
If a long form is hard to navigate, split it into focused stages to give visitors a clearer path through the questions. Gutena Forms Pro lets you add Step Break fields, configure step titles, choose a progress indicator, and customize navigation labels directly in the WordPress editor.
Plan the field groups before you build, keep each step focused, and test the entire submission process before publishing.
Ready to build your first multi-step form in WordPress? Get Gutena Forms Pro and follow our guide to get started.
Frequently Asked Questions
Can I Create a Multi-Step Form in WordPress for Free?
Gutena Forms Pro includes the Step Break feature used in this tutorial. You need the Pro version to follow these instructions. Check the current Gutena Forms plans for the features included with each option.
Do I Need a Plugin to Create a Multi-Step Form in WordPress?
A plugin is the most practical option for many WordPress users who want to build and manage a multi-step form through the dashboard. Gutena Forms Pro provides a Step Break field that divides form fields into separate stages.
How Many Steps Should a Multi-Step Form Have?
Use enough steps to group related questions clearly without making the process unnecessarily long. A short form may need only one page, while a longer application or questionnaire may benefit from several stages. Choose the structure based on the information you need to collect.
Can I Add a Progress Bar to a WordPress Form?
Yes. Gutena Forms Pro lets you choose a Progress Bar indicator for a multi-step form. You can also select Steps or None, depending on how you want to display progress.
Do Multi-Step Forms Work on Mobile Devices?
They can, but you should test the finished form on smaller screens. Check the field layout, labels, button spacing, navigation, and validation before publishing.
Can I Turn an Existing WordPress Form Into a Multi-Step Form?
You can use Gutena Forms Pro’s Step Break field to divide an existing Gutena form into stages. Open the form, add Step Break fields between the relevant groups of questions, configure the step settings, and test the updated form before publishing your changes.
Does Gutena Forms Support Multi-Step Forms?
Yes. Gutena Forms Pro supports multi-step forms through its Step Break field. You can configure step titles, choose a progress indicator, and customize the Next and Back button labels.